Since we now understand the trapezium rule and made a prototype implementation of the trapezium rule with Python, this post aims to benchmark implementations of the trapezium rule in C++ and see how efficient it is compared to the Python counterpart.
If you already have all the C++ development tools (Git, CMake, and Conan), and you already understand the concept, you can skip to the implementation sections.
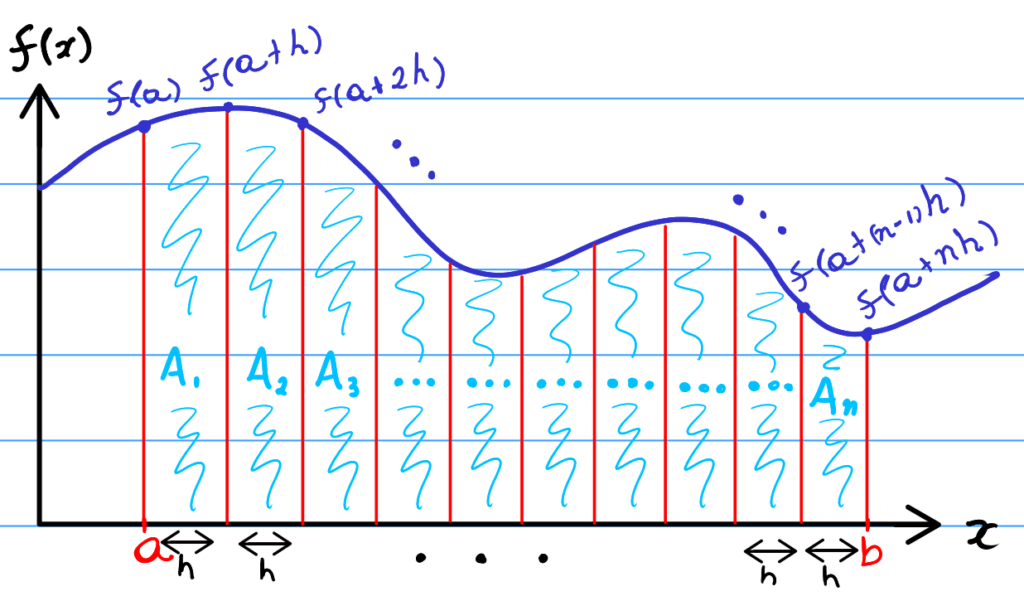
Optional Background On The Trapezium Rule
For the purposes of this post, I would highly recommend having a quick recap on the trapezium (or trapezoidal) rule. Specifically, it is important to understand how we can estimate function areas, and how samples are used in the trapezium rule calculation. If you don’t quite understand it, check out my post on explaining the trapezium rule.
In addition, if you are new to programming and are struggling to understand the code in this post, check out the Python implementation of the trapezium rule post; the Python code is somewhat simpler and easier to read, although the functions implemented are the same as the C++ counterpart.
Getting The CPP Trapezium Rule Code
Luckily for the readers, the project and code mentioned in this post were pushed to Github. If you have never of Github, it is a remote repository where people can upload code, making it easier to work in teams and allowing people to get your code – it is used for many open-source projects.
The project’s repository can be found here, and if you are a seasoned developer, you may be able to follow the README.md instructions to build and run the benchmarks.
C++ Tools To Build The Trapezium Rule Project
In this section, we will cover the tools needed to build and run the trapezium-rule benchmark executable. Since this is a C++ project, you will need a working C++ compiler, a build system generator (the program that tells your computer how to build the code), and a dependency manager.
Downloading A CPP Compiler
In simple terms, the compiler is the program that will turn your code into an executable, in other words, it will turn your code into instructions that the CPU can execute. Depending on your OS, I’d recommend the following compilers.
- Windows: the
msvc(Microsoft Visual C/C++) compiler is probably the best option if you’re on Windows. For personal projects, you can install it for free by installing the MS Visual Studio Community Edition, an excellent IDE with IntelliSense and CMake support. - Linux: if you don’t already have a compiler installed with your Linux distro, I’d recommend installing
gcc. On Ubuntu, it is as easy as running the commandsudo apt install build-essentialon your terminal. For other distros, Google should help you out on installing it. - Mac OS: I haven’t personally used this OS that much, but I’ve heard that the
clangcompiler works pretty well. Here’s a tutorial on installingclangcompiler viabrewon your Mac OS.
Getting CMake To Orchestrate The Build
As aforementioned, I’ve used a build system generator to handle the building of the code. CMake basically tells your computer how to build the code with the compiler you have installed. For more info on installing it, check out my post on an introduction to CMake.
Managing The C++ Dependencies With Conan
As this project relies on two external packages (Eigen3 and Google Benchmark), I decided to use conanto make it easier to install these dependencies for the build. Conan simply downloads all the dependencies mentioned in the conanfile.txt , similar to Anaconda for Python.
In order to install conan, you will need Python 3.x and Pip3 installed. Once you have those, follow the instructions to install conan in this page.
Understanding The Trapezium Rule C++ Implementation
After a fairly long introduction and dependency explanation, we are ready to look at the code! In this section, we will outline both implementations of the trapezium rule.
Similarly to the Python counterpart, I decided to provide two different implementations:
- Standard C++: An implementation solely using the CPP standard library (the
stdorstl) algorithms. - Numerical Library: An implementations using the
Eigen3library, as it’s one of the most popular linear algebra libraries for C++.
In both cases, the same algorithm was implemented, and it’s the same ideas used in the Python implementation:
- Given the number of trapeziums,
N, and the integration bounds,{a, b}, generate an array of input samples, or thexvalues. - Get the output samples for a function by applying the function to the
xvalues. - Calculate the trapezium rule estimate using the output samples and the trapezium height,
h.
The Standard C++ Trapezium Rule Implementation
In this section, we will explain the main points of the standard C++ implementation of the trapezium rule. As previously mentioned, this version of the trapezoidal rule only used the C++ std library algorithms.
Generating The Input Samples
Generating the input samples (or x values) is easy with the stl‘s std::generate_n(...) function. It basically generates some elements and inserts them into a container (such as an std::vector) with an output iterator.
std::vector<double> create_inputs(double a, double b, std::size_t n)
  {
  std::vector<double> samples;
  samples.reserve(n + 1);
  const double h = (b - a) / n;
  std::generate_n(std::back_inserter(samples), n + 1, [&] {
    auto const temp = a;
    a = a + h;
    return temp;
  });
  return samples;
}
Unsurprisingly, the code above returns an std::vector<double> containing all the x values to be used as input samples for the integration (between a and b). In addition, for n trapeziums, we will have n+1 elements in the returned vector. Unfortunately, it’s a little bit longer compared to the Python counterpart, but it’s probably way more efficient.
I’d recommend checking out the documentation and examples for std::generate_n(...) here. Moreover, if you aren’t familiar with std::vector<T> and its uses, check out my post on C++ vectors and how to use them.
Generating The Output Samples
Similar to the Python implementaiton counterpart, once we have the inputs (x values), the next step of the estimation is to get outputs for each value in the input array/vector.
template <typename Func>
std::vector<double> apply(Func f, std::vector<double> const& inputs)
{
  std::vector<double> samples;
  samples.reserve(inputs.size());

  std::transform(begin(inputs),
      end(inputs),
      std::back_inserter(samples),
      [&](auto input) {
        return f(input);
      });

  return samples;
}
As you could probably guess, the function above simply applies the input function (f) to each element in the input vector (inputs) and returns a vector with the outputs.
Admittedly, the above example is a little harder to understand if you aren’t used to templates. More specifically, the line template <typename Func> tells the compiler that the function is expecting a general type “Func”, and this type is used in the input parameters of the function apply. It simply means that f can be any type, and from looking at the implementation, you can see that, as long as f is a callable object taking a double, the code above will compile.
The templated parameter simply makes it easy for users to pass any function-like object: lambdas, function pointers (passing a name of a function), and functors should all work here!
Putting The Trapezium Rule Together
Finally, now that the output samples can be created, we can apply the trapezium rule formula. It is essentially the same formula shown in my previous Python post.
template<typename Func>
double estimate_area(Func f, double a, double b, std::size_t n)
{
  auto const samples = apply(f, create_inputs(a, b, n));
  auto const h = (b - a) / n;

  return  (h / 2) * (samples.front() + samples.back() + 2 * std::accumulate(begin(samples) + 1, end(samples) - 1, 0.0));
}
The code above simply creates the output samples with the help of create_inputs(...) and apply(...). In addition, the template Func is expected in the parameter in order to forward the “general” function f to the apply(...) function.
The return statement simply applies the trapezium rule formula and returns the result. Easy, right? Now let’s take a look at the Eigen3 !
The Eigen3 Trapezium Rule Implementation
Eigen3 is a C++ numerical library for linear algebra, and this means that it provides APIs to handle vectors, matrices and general algorithms for linear algebra mathematics.
For example, all the functions we have previously created to generate samples and get outputs would be greatly simplified by using the APIs that Eigen3 provides. More importantly, the APIs are very optimised for this domain, meaning that it will probably be more efficient than the standard C++ implementation.
All of the points mentioned here can be seen in the actual code, where the whole trapezium rule implementation is reduced to a short function.
Estimating Aread With Eigen3 And Trapezium Rule
Long story short, our previous create_inputs function is equivalent to Eigen::VectorXd::LinSpaced(...) function. Furthermore, we no longer need the apply(...) function if we work with Eigen3‘s maths functions that handle Eigen::ArrayXd objects (the underlying parent type of Eigen::VectorXd).
Without further ado, the code below implements the whole trapezium rule with Eigen3.
template <typename Func>
double estimate_area(Func f, double a, double b, std::size_t n)
{
  auto const inputs{Eigen::VectorXd::LinSpaced(n + 1, a, b)};
  auto const samples{f(Eigen::Ref<Eigen::VectorXd const>{inputs})};
  double const h = (b - a) / n;

  return (h / 2) * (samples[0] + samples[n] + 2 * samples.segment(1, n-1).sum());
}
Voilà! This is all we need for the Eigen3 implementation. Note how we also have a template for the f parameter so we can take any input function to estimate the area.
Eigen3 Notes For Seasoned Developers
If you are an experienced C++ developer, you may want to know a few things about Eigen3.
Firstly, Eigen3‘s implementation is heavily templated and makes good (?) use of polymorphism in it’s types. For this reason, I had to be extra careful when creating functions that take Eigen3types. For example, using the auto keyword for lambda parameters and variables meant that the unintended types were being deduced. Fortunately, I realised that using Eigen::VectorXd, as opposed to Eigen::ArrayXd does not incur as many copies, and performance is further improved when wrapping references in an Eigen::Ref<...> object.
Unfortunately, these problems can cause massive slowdowns at runtime. Due to Eigen3 deep copying certain types and not others, if the correct types aren’t deduced, you can expect your compiler to make a meal out of it. For example, you will see the type Eigen::Ref<...> being used in the code above, making sure that a const reference is passed around and not a deep copy of it (which could happen even when taking auto const& in a lambda context, if the type is not an Eigen reference object.
Benchmarks Of The Different Implementations
Finally, we can benchmark both implementations.
Before that, I just want to point out that I used Google’s benchmark library for proper benchmarking. Interestingly, if you have ever used Quick Bench, this is the library used to perform the benchmarks. It provides macros that make it easy to quickly benchmark functions in C++.
For more information, have a look at Google’s benchmark repository, as they have a very detailed README with all the info you need to get started.
The Benchmark Functions
benchmark requires static void functions that take benchmark::State& objects as the entry point for a benchmark. For this reason, I created the following function for the standard implementation benchmark.
template<int a, int b, std::size_t n>
static void BM_StandardImplementation(benchmark::State& state)
{
  // f(x) = e^(-x^2) implemented with the std
  // functions
  const auto f = [](auto const& x)
  {
    return std::exp(-x * x);
  };

  for (auto _ : state)
  {
    double area = std_trapz::estimate_area(f, a, b, n);
    benchmark::DoNotOptimize(area);
  }
}
As we can see, the first thing in this function is to define the lambda for the function whose area we’re estimating. Lamdas were used for this purpose, so the variable f is a lambda that takes a double and returns double. More specifically, f will apply the formula f(x) = e^{-x^{2}} to each input!
From here, the for loop is pretty standard Google benchmark code, where we simply call the standard trapezium implementation and store it to the variable area. In addition, we make sure that the compiler doesn’t optimise that variable out by using benchmark::DoNotOptimize(...).
You probably realised that the above function is templated, taking a, b, and n. These are essentially the other inputs to the estimate_area(...) functions, and they were templated so I don’t have to create a different benchmark function for each set {a, b, n}. Always let the compiler do the work for you!
Similarly, the Eigen3 implementation benchamrk was written as follows.
template <int a, int b, std::size_t n>
static void BM_EigenImplementation(benchmark::State& state)
{
  // f(x) = e^(-x^2) implemented with Eigen3
  // functions
  const auto f = [](auto const& X) -> Eigen::VectorXd
  {
     return Eigen::exp(-X.array().square());
  };

  for (auto _ : state)
  {
    double area = eigen_trapz::estimate_area(f, a, b, n);
    benchmark::DoNotOptimize(area);
  }
}
Benchmarking The Functions
Benchmarking the static void functions we created is as simple as typing the following in your main C++ file.
auto bm_standard_traps10x10x100= BM_StandardImplementation<-10, 10, 100>;
BENCHMARK(bm_standard_traps10x10x100);

// Call this after all benchmarks have been defined as above!
BENCHMARK_MAIN();
If you look at the Git repository for this project, you can see a bunch of different benchmarks defined just like the above in benchmarks/benchmarks.cpp.
Benchmark Results
Having spent time coding everything, this is certaily the most interesting part of this post. Do we actually gain anything from using Eigen3? How does the standard C++ implementaiton compare to the Python one? Well, the table below outlines the benchmark results for this little experiment (built on a x86_64 Linux machine).
| Inputs {a, b, N} | std C++ | Eigen3 |
|---|---|---|
{-10, 10, 100} | 1.997μs | 0.084μs |
{-10, 10, 1000} | 18.94μs | 1.080μs |
{-15, 15, 10000} | 200.5μs | 7.269μs |
{-15, 15, 20000} | 346.6μs | 19.31μs |
{-20, 20, 50000} | 1.366ms | 0.372ms |
I obtained similar results in my (slightly more powerful) Windows machine.
TL;DR – Was It Worth It?
Implementation-wise, the standard C++ is easier to understand as the code is a little simpler. However, if you are willing to run walk the extra mile, you get a massive performance boost with Eigen3.
From my point of view, learning Eigen3 can be quite confusing if you are new to C++. Even for seasoned developers, the library may seem a little confusing when it comes to type deduction with auto and how to avoid what-seems-to-be slowdowns when using the wrong types.
From an academic and production point of view, using a library that is optimised for maths can make things more performant, specially if you’re already used to something like Numpy.
Finally, the benchmarks show that, even with the standard C++ implementation, the wors-case scenario is still compareable to the most optimised Python implementation using Numpy. Of course, the Eigen3 implementation smokes all the other implementations I’ve posted about, with an average of ~3x performance improvement in the worst case.
In conclusion, this has been a very interesting experiment and just highlighted that, although Python is very nice and easy to prototype functionality like this, if you are looking for better performance, then the C++/Eigen3 implementation can be useful if you’re willing to spend some time researching.
For the full code, please see the Github repository created for this experiment.
Did I miss anything? Spotted any mistakes in the post? Feedback? Please feel free to post a comment below!
Be First to Comment