We have written the simplest C++ program, but how do we build it? In this article, I will give a brief description of CMake, a build automation tool that allows users to build software on different platforms.
Why Do We Need CMake?
If you have just started learning C++, you are probably using a popular IDE to edit and build (compile) your programs. Maybe MS Visual Studio, VS Code, or CLion. Unsurprisingly, these are not the only IDEs available that can build C++ programs and libraries, but what is the one thing that most popular IDEs have in common? CMake support.
Writing software for Windows is very easy: just download and install Microsoft Visual Studio and off you go. Compiling and running your program is as easy as pressing the “play” button in the IDE. However, what happens if you try and take your CPP project over to a Linux machine? You certainly will not be able to compile it because all you are left with, from the OS point of view, are files. Linux and other operating systems will not know how to “interpret” the Visual Studio solution (.sln) file that tells Windows how to compile your program.
This is where CMake comes in: it lets you define the representation of your project, and how to build it in a universal way, meaning that any environment with CMake support can compile your programs and libraries.
What Does It Do Exactly?
CMake is a build system generator. It creates the necessary instruction files for your system to build your project.
For example, if you are developing a program for Windows and you happen to have Visual Studio installed, CMake can generate a Visual Studio solution that you can use to compile the project. Or even better, Visual Studio, like many other IDEs, can integrate directly with your project’s CMake and directly compile your programs and libraries, without the need for the “middle man” solution file.
Similarly, if you are developing a project on Linux, CMake will generate the Makefile to completely compile all the executables and libraries in your project. All of this with a couple of commands.
Advantages Of Using CMake
By allowing users to universally define the structure of their projects, and decoupling the build system from the representation of your project, CMake allows us to cleanly develop software for multiple environments and platforms.
Therefore, the programs you write on your Windows machine can be easily ported to Linux or other operating systems, given you are using CMake and standard C++. Describing the structure of your code using CMake is all you need to do.
Not only does CMake let us write projects for multiple platforms, but it also provides tons of nice utility functions that can be very useful when building a project, such as:
- Copying files around.
- Fetching content from the internet.
- Finding system libraries to be included in your project.
- Finding third-party libraries to be included in your project.
- Adding custom commands to your build.
CMakeLists For The Simplest C++ Program
The simplest CPP program taken from a previous post and shown in the code box below is indeed not very useful. It will simply run and immediately terminate with no errors.
int main()
{
}
But how do we compile this with the help of CMake? By writing the CMakeLists.txt required by CMake. This file must be in the root of your project (the main directory of your project) and it must contain a couple of lines for CMake to do its job.
Before getting down to business, let’s analyse the project directory structure. Suppose I create a directory called simple_program which will hold the source file, main.cpp, containing the code shown above. The directorysimple_program is then the root of my project as it holds all the files.
Given the directory setup, we will then create a text file called CMakeLists.txt inside simple_programwith the following contents:
cmake_minimum_required(VERSION 3.10)
project(SimpleProgram)

add_executable(simple_program main.cpp)
Explaining The CMakeLists Commands
Luckily, that is all you need for a simple executable build. Let’s dive into the definition and purpose of each of the lines in the CmakeLists.txt:
cmake_minimum_required(VERSION 3.10)has to be added to the top of yourCMakeLists. It tells CMake the minimum version of CMake a user needs to have to build the project. In this case,3.10was added as it’s now a few years old and most people should have a newer version of CMake.project(SimpleProgram)sets the name of your project. It tells CMake the name of your project and lets you reference the name later on if necessary. Additionally, you can use the project(…) command to define versions, languages, and other metadata for your project.
In fact, I would recommend checking out the CMake reference page, searching for these commands, and reading more about them. Getting familiar with the documentation will only help you!
Building Your CMake Project
Once we created the project’s representation with CMake, building is easy. In this section, I will demonstrate how to build your project using the command line, MS Visual Studio, and CLion.
Building On The Terminal / Command-Line
Whether you are on Windows or Linux, the building process in the command line should be the same. Just make sure you have a valid compiler installed in your system, for example gcc on Linux or Visual Studio on Windows.
Checking CMake Is Properly Installed
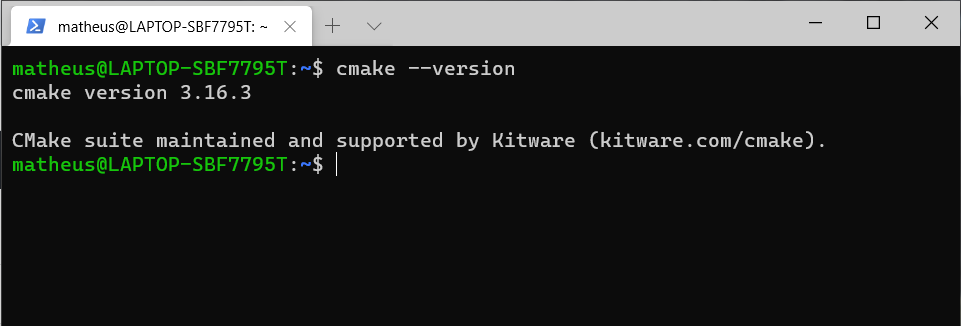
The assumption here is that you have a CMake installed in your system and you can call it from the command line, as well as having a compiler installed in your system. For example, if you are using Windows, open the command prompt, type cmake --version and press enter. If everything worked correctly, you should see your CMake version as the output.
If you are on Linux and installed CMake through your package manager (such as apt-get install cmake on Ubuntu), your system is probably all setup to run CMake.
However, if you’re on Windows and your system shows something along the lines of “CMake was not found”, then you need to install CMake and add the directory containing cmake.exeto your PATH environment variables. Usually, you need to go into Windows’ “system environment variables”, locate your user’s PATH variables and add C:\Program Files\CMake\bin to it.
CMake Commands You Need To Build Your Program
Once the requirements are installed building is easy:
- Navigate to the root directory of the project (by typing
cd simple_program), and create a build directory withmkdir buildand enter the directory withcd build. This directory will hold all the build files CMake generates. - Run the command
cmake ..from thebuilddirectory. This command will ask CMake to generate the build files. - From the
builddirectory, run the commandcmake --build .and wait until it’s all finished!
Congratulations, your executable called simple_program was created (simple_program.exe on Windows)! Just note that, if you used CMake with a Visual Studio compiler, the program will probably be inside a subdirectory of your build folder, just scout around until you find it.
Building With Visual Studio 2019
Building CMake projects with Visual Studio is easy. Just make sure you have CMake Tools installed for Visual Studio.
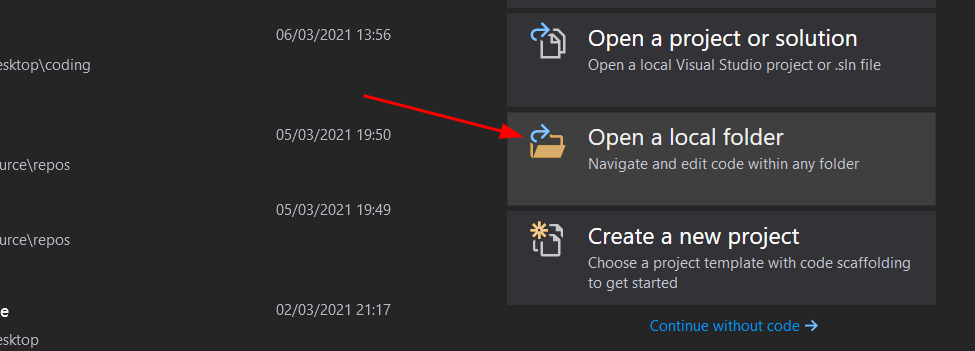
Firstly, simply click on Open a local folder and select the simple_program directory.
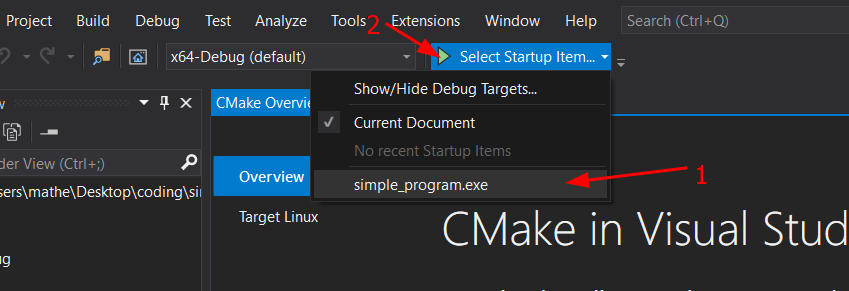
To build, select the target “simple_project.exe” on the top, and use the shortcut CTRL + SHIFT + B . Finally, to compile and run, click on the green play button at the top!
Building With CLion
CLion has CMake integration out of the box. In fact, that is the only way to open a project with CLion.
Firstly, make sure you have a compiler installed in your system. On Linux, I’d recommend gcc (using sudo apt-get build-essentials on Ubuntu). You can find out how to install it by Googling. On Windows, I’d recommend installing MinGW-w64, which comes with gcc – simply follow this tutorial by JetBrains.
Similar to Visual Studio, simply select File -> Open, then open the simple_project directory. However, if it’s the first time you’re opening CLion, click on the Open button, select the simple_program directory and click Ok.

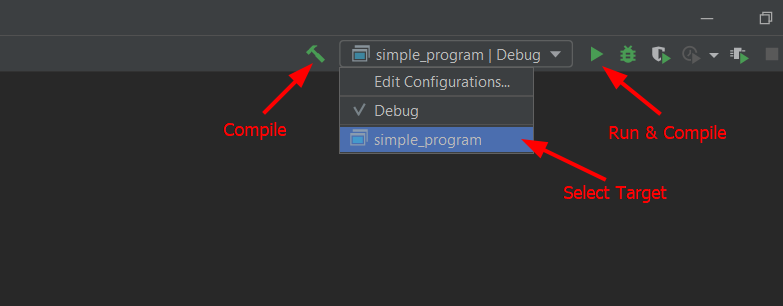
Select the target (we’ll talk more about targets in future articles) called “simple_program”. Following that, the shortcut to build is CTRL + F9, and for compiling and running the selected target, the shortcut is SHIFT + F10. Alternatively use the build icon (the green hammer), or the run button (green play button).
Did I miss anything? Do you have any questions? Please feel free to post questions and feedback in the comments!
Be First to Comment