Why should you need to learn useful command line tools? Mainly for boosting your productivity.
The start of your software engineer/developer career can be quit nerve-racking. As it’s natural to any newcomer, you will have many concepts to learn, software to get used to, and of course, a lot of coding to do – certain command-line tools can help you with finding your way around, handling data quicker, and generally help you with your daily tasks.
Specifically, this post focuses on outlining tools that every beginner developer should know. If you are a seasoned engineer, you may not find this post very useful as you probably already know most of the tools mentioned here.
Useful Command Line Tools For Usage And Documentation
Personally, when I hear the word “documentation”, I know I’m about to spend some valuable time reading very badly worded documents describing a certain tool or library. However, some documentations can be quite easy to digest, specially when provide many examples of usage.
Fortunately for you, “man pages” are there for this reason: manual pages are meant to be comprehensible documentation pages about tools installed in your system, and most of them even have many usage examples!
For example, let’s say you want to know what the clear command does, and what options you can pass to it:
man clearAs you can guess, the example above will show a description of the command clear, and the possible options you can pass to it. Essentially, it will show you a manual for the command you want!
I would highly recommend reading more about it by typing man man in your terminal, as it will be quite useful for the remaining of the post. You can navigate through the manuals with the up anddown keys, and quit it with q.
Alternatives To Man Pages
If you don’t quite like the format of man pages, there are a couple of other beginner-friendly alternatives.
Specifically, tools like bropages, cheat, and tldr might suit you if you don’t want to read all the cumbersome text that man pages produce. For comparison, the video below by DistroTube outlines each tool and their usage.
bropages, cheat, and tldr.Reiterating what many people say about man pages alternatives: you still need to know how to read man pages for the finer details. For example, if you want to know how to use openssl, then the manual pages will contain all the possible options and modes for the tool, unlike the “shorter” alternatives to man pages.
Watch The Way I Navigate With These Useful Command Line Tools
Most of the time, if you’re using the terminal to perform tasks, you will need to navigate your way through the filesystem, and if you are a complete beginner, you may want to learn some of the tools mentioned in this section.
Just as a heads-up: if you’re an experienced command-line user, you probably already know most of the tools mentioned here.
Viewing, Creating and Changing Directories/Folders
To make it easier for you, I’ve summarised the three highly-important tools you need to know to manage directories, and you can simply use man TOOL-NAME to find out more about each one!
cdstands for “change directory”, and you can use this tool to navigate through your filesystem. For example,cd ~/Downloadswill navigate to your home directory’sDownloadfolder. In addition, you can use this tool with absolute and relative paths!mkdirstands for “make directory”. As you guessed, you can create directories with this tool. For example,mkdir /home/matheus/developmentwill create a folder called “development” under my home directory. Similar tocd, we can use relative and absolute paths with this tool.treewill display all the files, subdirectories and the files inside those directories. It’s a useful tool if you want to see the complete structure of a directory. For illustration, see the image below for an example output!
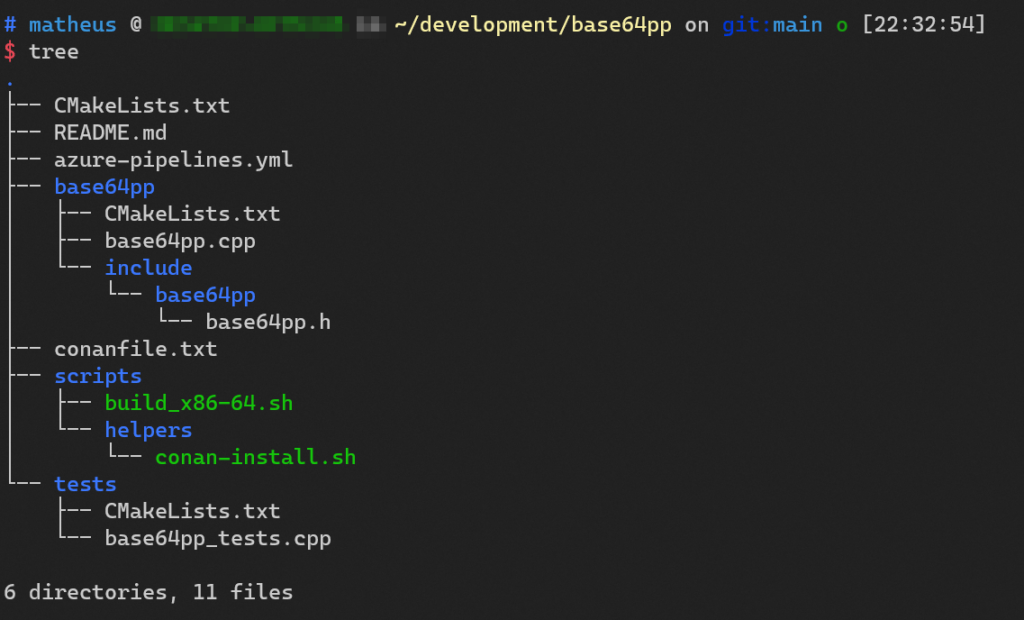
tree terminal tool to view the entire directory structure.Managing Files – Creating, Moving, Renaming And Viewing Files
Naturally, once you’ve mastered navigating through your filesystem, you will probably also need to manage your files. Essentially, this means you need to create, move and view files.
Most of the tools mentioned here should come with most distributions of Linux, but if you find that xdg-open isn’t available, you should Google how to install xdg-utils for your particular distribution.
Without further ado, if you’re a beginner terminal user, make sure you know how to use these tools and their options:
mvstands for “move”, and this tool simply moves one file to another location. This means that, if I typemv old_file.txt new_file.json, I will be renaming “old_file.txt” to “new_file.json”. Furthermore, this is a powerful tool for renaming and moving files around!touchwill simply create an empty file of any type. For example,touch README.mdwill create an empty file called “README.md” in my current working directory.xdg-openis a powerful tool that will simply open whatever file you give it with a default program. It has a default database of preferred programs for well-known filetypes, but you can also modify the default programs for each filetype – just look at themanpage for it! As an example,xdg-open portrait.pngwill open the “portrait.png” picture with my default image viewer.
As you may have noticed, the touch command only creates empty files. If you’re thinking of creating valid files of various types, you will probably use other tools to do the job. For example, I personally use vim to create text files in the terminal, and gimp or photoshop to edit and save image files.
Finding Files In Your Filesystem
Searching through your filesystem can be a cumbersome task if you’re doing it manually. Luckily, you can simply use the terminal to search files and through files.
The first worthy mention is find. If you’re a seasonal developer, you already know that find is a very useful command, and you can probably skip this section!
Unsurprisingly, the find command finds files based on certain criteria. For example, it can find all your Python files from the current directory with find . -name "*.py" . For more information, you should look at the man page for find, and you should also probably look at very useful examples online, such as:
- Finding files and executing a command on those files. Interestingly, this is very useful for tools like script/file formatters (like
pylint,clang-format,shellcheck, etc), so you can keep your code always properly formatted and standard accross your codebases!find-ing out about this is left as an exercise to the reader! - Using regular expressions to find files with names that follow a certain pattern.
- Finding files bigger than a particular, for example
find . -name ".7z" -size +10M, which finds all 7zip files bigger than 10MB from the current directory. - Finding directories and different file types. For instance
find /home/my_user -type d -iname "*d*",which finds any directory under/home/my_userwith a letterdin it’s name.
In addition, there are many other uses for find, and if you’re starting out as a software developer, you should become familiar with this command.
What About Searching Contents Of Files? This Is Why We Have grep
Let’s suppose one of your first tasks is refactoring some code, and you really need to rename that function to something that actually makes sense. Ideally, you would think of using your preferred IDE to perform the coding changes, which is absolutely fine.
However, what if the function is mentioned in documentation files, or in other text-base files? Certain IDEs only bother looking at the project files, which may not include all those pesky documentation files.
Luckily for us, grep is pretty much a core part of Linux, and it helps a lot when you’re looking for patterns in text files. Usage is fairly straight-forward if you’re looking for a particular text occurrence. For example, grep -nr hello will look for “hello” in any file under the current directory and subdirectories.
I would highly recommend finding out more about grep, specially using regular expressions and displaying the context (lines around the found instance), as these are really common use cases for developers!
Bonus – FuzzyFinder As A New-Age Global Finder
If you’re tired of using find, or find it too old-fashioned, then I have good news for you. FuzzyFinder (FZF) is pretty much a new-age find: very easy to use, not as complex and also more interactive than find.
FZF finds anything in the terminal, not only files. However, installing and running the vanilla fzf tool will bring up a file finder from the directory you’re currently in. In addition, the UI is very interactive and it matches anything with the characters you types, hence the “fuzzy” in the name. As an example, the following gif shows the usage of a vanilla fzf command.

fzf command. In addition, FuzzyFinder works really good with Linux’s pipes in terminals, as well as passing the output of fzf to other commands. For more information on FuzzyFinder, and all the very useful tricks you can do with it, I’d recommend reading Alexey Samoshkin’s article on why you should be using FuzzyFinder. For a more useful example, the image below uses fzf in conjunction with xdg-open to search and open an image file I vaguely knew the name of.
fzf and xdg-open.Useful Remote Access Command Line Tools – SSH’ing Your Problems Away
At some point in your career as a software engineer/developer, you will come across remote machines you need to access. Luckily, there are out of the box tools you can use to connect to a machine remotely, even on Windows!
Since I don’t want to make this post too big, I will give a brief explanation of the important tools you should learn for remote access purposes in the list below.
sshis perhaps the main tool to go out there and learn. This tool allows you to access a terminal in a remote machine, through the SSH protocol. I’d recommend some extensive googling onssh. In fact, you can even practice the usage by spinning up ansshserver on a different machine, within your network (i.e. same Wireless connection).scpstands for “secure copy”, and it simply copies a file to another location. Interestingly, the destination can be a remote machine that hassshenabled, asscpuses the SSH protocol. If you haven’t got the memo,scpallows you to copy a file from your machine to a remote machine with SSH.ssh-keygengenerates private and public keys. These keys can be used with either thesshcommand, or with certain services like code repositories. Unlike the other two tools mentioned here, I’d recommend learning this tool as you need it; you may not need this functionality straightaway, but when you do, it is very useful knowing how to use it.
Viewing (Mostly Text) Files In The Disk With These Command Line Tools
Suppose you’ve connected to you Google/Amazon cloud instance (a fancy name for a computer on the cloud) with ssh. For some reason, you need to view/edit the source code of your webpage on the remote terminal. How can you view and edit these text based files?
Luckily, there are command line tools that allow you to edit text files. I’ve outlined three of the most popular choices in the list below.
nanois probably the go-to text editor for absolute beginners. Unsurprisingly, it opens text-based files in the terminal, and allows you to edit those files. The user interface is fairly simple, and you can use the arrow and control keys to navigate around the file.vimis a more advanced terminal text editor. Unlikenano,vimis a highly customizable text editor, with support for plugins and key-maps. In addition, it has many useful functionalities such as search and replace, jump to lines, etc. It’s worth noting thatvimis an acquired taste, and it takes hard work to learn to use it.emacsis another popular text editor you can customize. I’m not much of anemacsuser, but I know it’s also highly customizable, and a fierce competitor tovim.
A Few Notes On Text Editor Tools
Bear in mind that, although nano is very basic compared to the other two editors mentioned above, it’s perfectly fine for beginners. For example, I still use nano for trivial text edits, as it’s essentially the equivalent to Windows’ notepad.
If you are planning on becoming a more advanced command-line/terminal user, then you should know you can do everything a fancy IDE (such as VS code) can do in your terminal. For example, I recently wrote a full C++ Base64 encoder project on my Raspberry Pi using Vim, including all the code analysis tools, support for different file tabs and code completion. I may write about how you can get your Vim to look and feel better than IDEs in the future…
On a different note, there’s usually this rivalry between vim and emacs users, as each user base claims their preferred app is better! However, if you are interested in learning one of them, I’d recommend watching videos and reading online guides to see which editor best suits you. Once again, if you want to stick to nano, there’s no shame in that!
What About Command Line Tools To View Non-Text Files?
Before this section is finished, I’d also like to mention the command hexdump. Say you have binary files such as images, music, or perhaps even actual executables. In addition, say you would like to visualise what data inside these files, or even check they aren’t empty. hexdump allows you to do just that! It will output the bytes (in hexadecimal format) of any given file – quite a useful trick if you’re wondering what’s inside small binary files. For more information, I’d recommend checking the man page for it.
Git-ting Good At Contributing To Coding Projects With Git
By now, you should be familiar with the tool git. However, since I have seen many people misusing, or simply not using git to it’s full potential, I thought I would point beginners in the right direction.
The sections below detail, in my opinion, important workflows you need to learn for git.
Commands To Create And Track Branches
As a beginner, you should definitely know how to create branches and tell your remote how to track it.
It’s always easier to have short-lived branches with few additions than to push all your work to master. Believe me or not, I’ve had very bad experiences in companies that did not do this!
The basic command for creating a repository is shown in the following codeblock.
git checkout -b BRANCH_NAMEHowever, the command above only creates the branch locally. Following the local branch creation, you will need to “push” it to the remote server (such as Github). For this reason, the command in the following block will push the new branch to the remote, and your local branch will track the remote one.
git push -u origin BRANCH_NAMEFor more information on basic branching with git, I’d recommend reading the Basic Branching And Merging article on Git’s website.
Learn Conflict Merging Commands As You Will Certainly Need Them
Often when merging your feature branch work into main, you will find that you edited the same line in a file as someone else in your team. In this case, git will see the conflict and will ask you to merge it. In simple terms, you will need to figure out which changes you want to keep.
Many people tend to use UIs that will aid with this (such as kdiff). However, if you’re used to working with terminal text editors, you can quite easily use the same tools for merging conflicts.
In fact, you just need to understand the conflict messages. For example, git will normally add lines around the conflicting lines including the word HEAD and the conflicting commit message. You should get used to that format, as well as being able to distinguish between your changes and somebody else’s changes.
Moreover, I’d highly recommend reading the Advanced Merging article from Git’s website. It will teach you how to master the git merge command.
Keeping Your Branches Up-To-Date With Git’s Rebase Command Line Tool
In simple terms, rebasing a branch A on top of another branch B will bring all changes of B to A .
git rebase simply brings changes from one branch into another. For example, you can bring the newly merged master/main changes into your not-so-updated feature branch.
In my opinion, this is a really good habit to have: rebasing your branches on master daily. For example, your feature branch can bring in all the new changes from master into it, by rebasing on master – this allows you to see the current conflicts and merge them.
git fetch origin master
git rebase origin/master
Unsurprisingly, the commands above will fetch the latest changes from master, followed by a rebase onto master. This means that, if it all succeeded, you should have the latest changes in your feature branch!
For more information, have a look at the git-rebase documentation on Git’s website.
Other Useful Git Commands Line Tools And Techniques
As this article is already quite big, the following list summarises git commands and techniques you will find useful when working with code.
- Mastering rebase interactive with
git rebase -i HEAD~N. Basically, this will allow you to squash multiple commits into one, drop commits, move commit orders and edit their messages. Very useful tool if you want to keep yourgithistory clean. Thought Bot’s Git Rebase Interactive article provides many good reasons to using this tool! - Using
git reflogandgit resetto undo your mess! Yes, even if you force push changes, you can still undo them with these commands.git refloggives you yourgithistory and hashes you can revert to. For more information, Google these terms! - Creating a
.gitignorefile to tellgitto ignore changes in specific files. Again, there should be plenty of articles on this, just Google it!
Other Command Line Tools And Techniques You Should Probably Learn
To finish off this article, the list below outlines a few more command-line tools and trick that may help you in your day-to-day coding tasks.
- Changing permissions of files and directories with
chmod. For example, allow your shell script to be executed withchmod +x some_script.sh. In addition,chmodcalculator is useful for getting the permissions “number”. trcommand for extracting/formatting words in the terminal.historyfor looking at the commands you previously used. Great when combining withgrep.- Reverse searching with
ctrl+r. Not a command per-se, but if your shell/command-line supports this, this is useful for auto-completing commands you previously used! - Compressing and extracting files with
zipandunzip. This may require you to install these utilities first, so Google it for your specific distribution/OS. pinglet’s you test your connection to a particular host/website. Useful for knowing if you can hit a particular website!- For the C/C++ programmers,
xxdis very useful for turning the contents of a file (in binary) to a C-style array. For example,xxd -i hello.txtwill give an array of bytes with the contents ofhello.txtin hexadecimal. It will also output the size of the array.
Have I missed anything? Do you have any suggestion for the post? Spotted any typos? Feel free to comment below!