CI/CD is very important when writing modern software. Whether you’re working on a personal project, or a bigger project with multiple contributors, ensuring that every commit added is up to high standards is always helpful. In this post, we will create an Azure C++ pipeline to help you elevate your code quality!

In this post, we look at how to create a simple, yet effective, Azure Pipeline for C++ projects. Specifically, we will focus on how to automate building, testing, documenting, and fail-fast operations for C++ projects!
Check out the list below if you want to jump to a particular section, as writing CI pipelines involves many different topics.
Writing A Simple C++ Azure Pipeline – Steps
The list below shows the steps you should probably consider when creating an Azure pipeline for your C++ code.
- An introduction video to pipelines.
- Creating a good Docker container to pick up your jobs.
- How to lay out the stages in your C++ pipeline.
- Check out the pipeline code!
An Introduction To CI/CD Pipelines – Youtube
If are a visual learner, and you are new to CI/CD, check out the video below. We look at what CI/CD is, and how a C++ pipeline may look like!
Creating The Perfect Image For Your C++ Pipelines
Automating tasks isn’t necessarily difficult, but it does require a computer to run the tasks! More specifically, we need a container to run your jobs on a theoretical machine. Ideally, a container that contains all the tools necessary to run your tasks.
This is where Docker comes in – a way to create your own container with all the tools necessary to check, build, and test your code in your pipelines.
We will not get into exactly what Docker is in this post, but I will say that Docker enables you to share the automation environment between different systems, including pipeline agents in Azure! In this case, the term “agent” refers to a theoretical (maybe physical) machine that’s actually executing the pipelines. If you’re looking for a detailed description of how containers differ from other concepts like VMs, feel free to Google it.
In this section, I will share my best tips on how you can create the most lightweight images that contain the most popular tools for C++ project building and testing, including:
gcc/g++compilers, on a fairly modern version.- Package managers like
conanand/orvcpkg. - Linting & analysis tools like
clang-formatandclang-tidy. - Documenting tools like
doxygen, so you can automate documentation generation.
Keeping Images Lightweight – Quicker Downloads In Your Pipelines
If you do choose to use a custom container in a pipeline, the agent/runner is going to download the container from the Docker hub every time it needs to use it!
For this reason, it’s a good idea to keep your images as small as possible. Here are some good tips for keeping your docker images as small as possible:
- Start from a small base image. Historically,
alpine-based images were known to be fairly small. However, even officialubuntuimages are about 20mb, so make sure you start from those. - Only install the necessary tools! For example, if you’re only using a container for building C++, then all you need is the compiler toolchain, CMake, and other C++ related tools. No more than that.
- Make sure to clean up after you’ve installed your tools. You don’t want to end up with intermediate dependencies that are no longer needed. Running commands like
apt cleanto clear the intermediate cache onubuntuimages is an example of cleaning up. - Removing unnecessary files can decrease the size of the image. For example, removing
/var/lib/apt/lists/*can help you remove a few megabytes onubuntuimages. - If you’re building anything from the source, don’t forget to remove all the source and build files after your tools are built!
All the points above are dependent on the base image and distribution you’re using, so make sure to research before you push your containers! I was able to remove over 100Mb from my compressed container size when some of the techniques above were applied.
The Perfect C++ Docker Container For Azure Pipelines
I know. You probably skipped the entire Docker section just to get the final container… And that’s fine, here it is.
To summarise the container I created and pushed to the Docker hub (link above) has the following tools:
- LLVM tools (
clang,clang-format, andclang-tidyversion 13). python&pip3.6.9conan2.0.2cmake3.25.2gcc10doxygen1.9.6
In addition to all the tools that come with the ubuntu-bionic base image. All of this, for only 280Mb. That’s right, I’ve seen containers with only the gcc toolchain installed with overall sizes >300Mb. With my image, you get all of that, plus clang and some other tools.
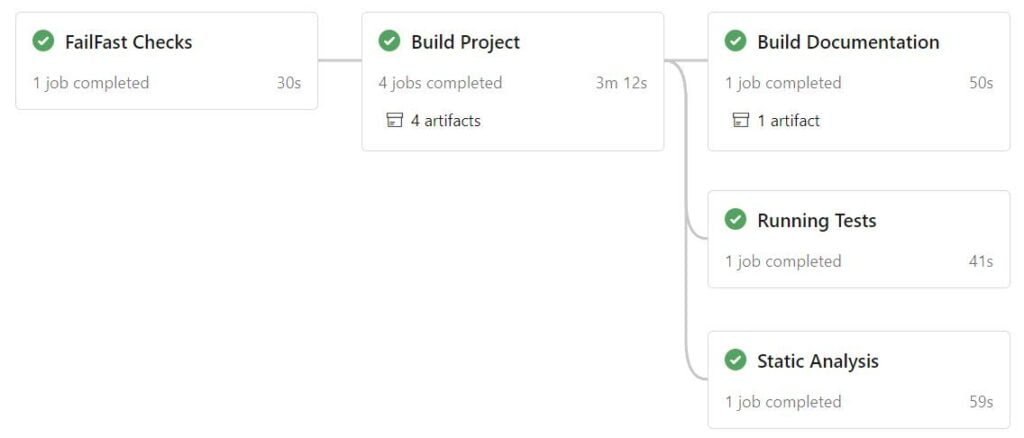
The Best Stages For Your C++ Pipelines
In this section, we will look at my favourite way to configure your pipelines. More specifically, we will be talking about the different stages that a C++ build, test & deploy pipeline may need.
If you’re not familiar with the CI/CD lingo, take a look at the Microsoft blog post about pipeline stages in Azure, the definition is the same across all CI/CD providers.
Fail Fast Stage – Quickly Rulling-Out Bad Code
Every good pipeline design will make sure that no unnecessary jobs will run if the update is bad. For this reason, you should set your pipeline to fail fast! In other words, this means your pipeline should be stopped as soon it encounters a failure.

To accomplish this, make sure you add all jobs that have no dependencies to other jobs at the start. Particularly, quick code check jobs should also be able to fail fast.
The following list shows some jobs that can be added to the first “fail fast” stage in a C++ build pipeline:
- C++ code linting with something like
clang-format. - Shell script linting with
shellcheck. - Checking for exposed API keys.
- Any other quick job that doesn’t depend on anything!
The rule is, if it’s a quick job that can annoy you if it fails at a later stage, and if it has no dependencies, it should probably go into the “fail fast” stage!
Build Stage, the Bread And Butter Of Your C++ Azure Pipeline
Understandably, this is the most important stage of any C++ pipeline. This is where your code will become alive!
If you have a CMake project, this is simply about calling a build script, with the correct build flags. Obviously, you could inline all the CMake calls into the pipeline yaml file, but avoid doing that so you can keep your pipeline definition clean. Make scripts!
Check out a common steps structure for a build job:
- Check out the code, including submodules.
- Pull all dependencies if using a third-party package manager, like
vcpkgorconan. - Calling the build script, internally calling CMake. This video about using CMakePresets.json may be helpful.
- Publishing build files (artifacts) for later jobs to use. I.e. so you can download the built tests in the tests stage.
For the specific build pipeline yaml, check the link at the bottom of the post. I implemented all the above steps for build jobs. In addition, I’ve provided multiple build jobs for different platforms like {Ubuntu, Windows}, as well as different configurations like {release, debug}.
Quickly Finding Bugs With The Testing Stage
Although some people hate writing tests, they are very helpful to aid you in developing quality code. Having automated tests running on every update you make to your code is even better.
Below are some of the jobs that you should probably include in the ideal C++ Azure CI pipeline.
- Running all unit tests with
ctest.- Download the build artifact from the build job.
- Prepare the environment for running the tests.
- Perhaps even gather and create coverage reports.
- Bonus points if you fail your pipeline based on low coverage!
- Running functional tests. Similar to unit tests but it does depend on the framework you’re using.
- For advanced C++ code safety, you can enable memory checks during test execution!
Admittedly, the pipeline linked at the end of this post does not yet include all the techniques above. At the time of writing, I’m still adding some of the more advanced checks into the pipeline testing stage.
Documenting With Doxygen
There isn’t much to talk about here. The point is, if you’re making a public API, or a library that people can use, you should also be generating comprehensive documentation.
For C++, this means that you can integrate Doxygen into your pipelines. By integrating Doxygen with CMake (article by Victoria Rudakova), you can automatically also create a Doxygen generation stage/job.
The pipeline in this post has a Doxygen generation stage, which expands on Rudakova’s CMake integration and adds a nicer Doxygen template with Doxygen-Awesome.
Static Analysis And More Complex Code Tests
Aside from building, testing, and documenting, you can also do more advanced things with your C++ code. After all, if you can do it on the terminal or in a script, you can do it in a pipeline!
For example, every C++ project should be statically analysed to prevent common bugs. This is something that is automatically enabled in complex IDEs such as Visual Studio. However, if anyone is pushing code to your repository, you probably want to make sure that the pipeline checks their coding practices too.
With tools like clang-tidy, you can integrate static analysis quite all with CMake’s compile_commands.json .
In addition, you can further prove Rust fanboys wrong by adding readily available tools to your pipeline, making sure you only allow safe and efficient code in your C++ project:
- Fuzz testing if you’re making APIs that take on user input.
- Thread sanitizers to make sure you’re developing safe multithreading code.
- Performance benchmarks to make sure you have no performance regressions.
And many more! Do a simple “C++ dynamic analysis tools” search and you will find other useful analysis tools you can integrate into your pipelines.
Deploying A C++ Application Or Library
CI / CD does not exist without the CD part! But unfortunately, if you search for “continuous delivery” or “continuous deployment”, you will find plenty of web app examples. C++ is lacking here.
So what does a continuous delivery stage looks like for C++ projects? Well, that depends on what sort of project you are creating.
However, whether you’re developing a library or a full application, there’s one thing in common: think about how your users will use your product, and automate that delivery. In other words, can you automate the process of packaging your project in a pipeline? Can you automatically make those packages available to customers? And even better, can you automate the “installing” part of your package in a pipeline?
This is what continuous delivery is about. Make sure you automate the delivery of your project, so anyone with access to your staged packages can download them and try them out. And even better, if you want to continuously deploy, you can make every new change generate a new release candidate automatically, without human intervention.
For example, here’s a theoretical approach to packaging and delivering your library C++ project into a conan package:
- Build for the platforms you support.
- Upload the important, exported build files and headers to a feed.
- Create a
conanfile.py– a recipe to install your package, downloading necessary files from the feeds. - Uploading your
conanrecipe to your recipe repository, with a new staging tag. - Bonus (auto-deployment): can you spin up a container and automatically install that package? Can you run targeted tests?
At the time of writing this article, I still haven’t included a continuous deployment job. But I will update this as soon as I finish it!
Where Can I Find The Example Azure Pipeline Yaml?
without further ado, you can find the azure-pipelines.yml in this C++ Base64 repository. Initially, I created this repository to show you how to implement Base64 in modern C++, so check it out if you are interested.
These are the files you need to copy to your own CMake project:
-
azure-pipelines.ymlfor the actual pipeline definitions. scripts/*to get all of the build scripts and helper scripts.CMakePrests.jsonso the CMake build can use the presets for common platforms.
Note that, the pipeline definition and build scripts assume that you have a structure similar to mine. I.e. your top CMakeLists.txt is located at the root of your project, you have a conanfile.py .
Feel free to post suggestions for improving this pipeline in the comments! Thank you for taking the time to read this.
Be First to Comment